The Cost of a Solo Southwest Road Trip

Canyonlands National Park. All photos courtesy of the author.
I’ve been telling myself since I moved to Colorado a few years back that I needed to take a trip to see the wonders of the American Southwest while I was out here. With no other summer plans lined up, this year seemed like my year. This July I started doing research and booking rooms. My plan: fly out to Las Vegas, pick up a rental car, and drive myself back home to Denver, stopping at several national parks along the way. As I was budgeting and trying to manage my costs, I figured The Billfold might also be interested in the cost of my trip. So I kept my receipts to give a thorough report.
First off, let me answer the obvious question:
So you went on a road trip to the desert… in August… by yourself?
Yep! The timing was not ideal on my part. Most of the places I visited were over 100 degrees Fahrenheit during the day, which is not ideal hiking weather. Summer is also peak time for visitors in many of the parks, which means more crowding, more difficult parking, and more expensive lodging.
However, this is the time that worked best for me. I didn’t take any vacation leave between January and June in order to stock up enough time to do the kind of trip I wanted (and have enough leave left over for holiday travel). My graduate school semester also starts in late August, and it was not realistic for me to take time off from work and school for this trip. While the timing was not ideal, the trip was still doable, and I’m happy with my choice.
This was also my first time taking a big trip like this by myself. I like traveling with people, so if someone had been available to join me, I probably would have went with them (and happily split the costs). But when my few tentative travel partners dropped out, I decided to go by myself. I personally don’t feel that one way of traveling is superior to the other, but I certainly found some unexpected benefits to traveling by myself.
Pre-travel costs and acquisitions
- America the Beautiful National Park Pass: $80
- I’m not going to include this in my trip total, since I purchased it last October, mainly so I could use the fast-pass lane at Rocky Mountain National Park near where I live. This thing paid for itself in spades — it gets you access not only into every national park, but also anywhere operated by the Forest Service, Fish and Wildlife Service, Bureau of Reclamation, or Bureau of Land Management (BLM).
- Windshield shade: $10
- I didn’t want to pack the large accordion-style windshield shade from my own car, but it seemed like something I would need during summer in the desert. So instead I purchased a windshield shade that folds up into a 10-inch disc. After opening it, I never folded it up again, choosing to just toss it in the back when not needed.
- SD card: $30
- I’m not a professional photographer, so I relied on my phone for pictures. That said, I am very snap-happy and have been bouncing up against my phone’s current storage capacity for a few months. I bought a fresh memory card so I wouldn’t have to worry about deleting things on the fly.
- US Road Atlas: FREE (to borrow)
- I wanted this as a low-tech backup in case I couldn’t get a GPS signal, and almost bought one. Then the solution came to me in the night: the library. Support your local libraries, y’all.
- One-way flight from Denver to Las Vegas: $79
- Shout-out to Southwest for no change fees. I originally purchased my ticket for $113, but switched to this flight when I saw the price dip. Yes, technically they only gave me a credit instead of a refund for the difference, but I feel confident I’ll use that credit later.
Ready to hit the road! Here is my trip, broken down by day. (Note: All amounts are rounded to the nearest dollar and include tips.)
Day 1: Las Vegas, NV to St. George, UT
Food: $78
Lodging: $60 (Airbnb)
Gas: $0
Other: $26
My trip kicked off with an early morning wake-up to make my 6 a.m. flight (foreshadowing for the rest of the trip). Not much was open at the airport, so the line to get breakfast ($9) at Einstein’s Bagels was three times the length I’ve ever seen it. But luckily the rest of the flight was smooth and easy. After landing I picked up my rental SUV and headed to the grocery store for my first fill-up. I bought water jugs as well as some snacks ($18) so that if something happened to the car I’d at least have some supplies.
First park: Valley of Fire Nevada State Park ($10 entry fee; the National Park Pass does not cover state parks). The hike I was most excited about was to Fire Wave, a 1.5 mile round trip with less than 250 ft in elevation gain. Even in the summer heat, I thought I would be okay by packing water, wearing a hat, and slathering on the sunscreen.
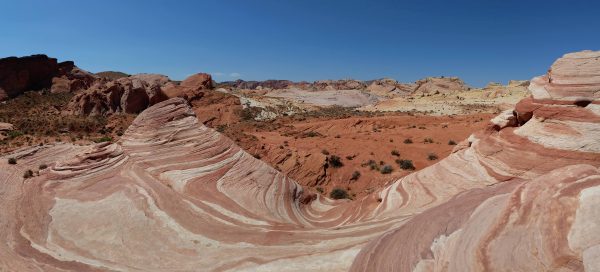
The Fire Wave.
I was not okay. I suppose it’s for the best that I learned my lesson about desert hiking early in the trip. It was over 100 degrees Fahrenheit, and even packing in extra water was not going to save me from the scorching heat. I later learned from a Park Ranger at the visitor center (which I stopped by after my hike) that even a few degrees in the desert can be the difference between a hard, sweaty hike and a miserable, dangerous hike. It didn’t help that I took a 10-minute detour after misinterpreting a trail sign. I was able to alert a fellow solo hiker also on the trail that we were off course, and she in turn was able to serve as cheerleader on the tail end of the return hike. The rest of my hikes in the park were confined to within 50 yards of the car.
I kept driving to St. George, Utah. It’s an hour away from Zion National Park, but considerably cheaper than the town right outside the park. To kill time before checking into my Airbnb ($60), I drove around to see parts of the Red Cliffs Desert Reserve and Snow Canyon State Park. The 105-degree temperature kept me from actually entering for a hike. Then I went for a grocery run to pick up some dinner, snacks, and emergency aloe lotion (amazingly, I was not sunburned, even though it felt like it). I also bought a cute shirt ($13). What kind of grocery store has a huge clothing section?
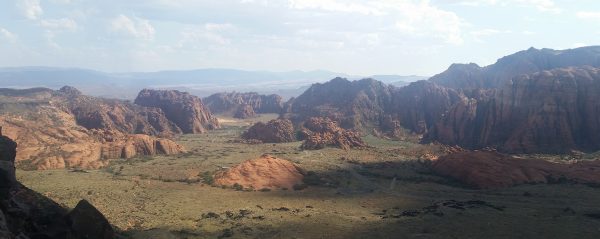
Snow Canyon State Park
You’ll notice throughout this article that I did not camp. This definitely would have saved me money on the trip. Many camping sites have lots for $40 a night, even in summer, and BLM offers a range of first-come first-serve FREE campsites at many locations. But I don’t really like camping, and the thought of not having air conditioning in summer in the Southwest made me nervous. Sure, people do it, but I am far from a hardened outdoorswoman, so I ponied up for some comfort.
Day 2: Zion National Park
Food: $26
Lodging: $60 (Airbnb)
Gas: $30
Other: $28
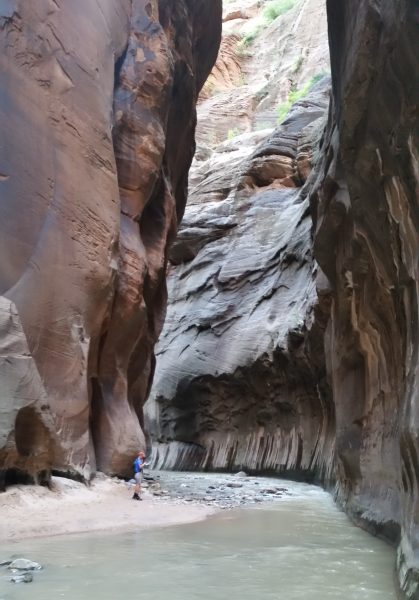
Up early again to drive an hour to Zion National Park (free with pass) in time to catch the first park shuttle out at 6 a.m. Cars are not allowed in the park during summer to avoid congestion, and parking lots tend to fill up, but there was plenty of room at six in the morning. I took the shuttle all the way to the end of the line to hike the Narrows.
The Narrows, as its name implies, is the narrowest part of Zion Canyon and can only be hiked during certain weather conditions. The trail is mostly in the Virgin River, and the 2,000 feet tall, narrow rock walls make the area dangerously prone to flash flooding. Luckily conditions were great, despite storms having closed several of the park’s other iconic trails, such as Angels Landing, back in July.

The Narrows, Zion National Park
The hike was amazing. It was a unique experience to hike in water that fluctuated from shin-height up to my navel. The rising sun changed the light in the slot canyon throughout my hike, and it was hard not to stop and stare after every bend. I turned around after about 3 miles, just short of a section where others reported the water was coming up to their necks. The crowds didn’t really get thick until I was almost back up to the trailhead.
A librarian I talked to in St. George had likened Zion National Park to Disneyland with obvious distaste: lots of crowds, waiting in line, and a highly curated experience. She was not totally wrong, but… I like Disneyland. I also loved Zion. Even though I had brought a change of clothes, I was pretty exhausted after my Narrows hike and chose to ride the shuttle around only to do a few shorter hikes. I had a lot of fun and would absolutely come back to do some other hikes, even though I had to make a stop in town to pick up some personal products ($4) for unexpected, um, chafing that came with hiking in water.
The Narrows, Zion National Park
In town, I also picked up some earrings and a bracelet I liked ($24) while in a shop for a post-hike ice cream treat ($3), before getting some dinner ($23) and heading back to St. George. I ended up with a second dinner when my Airbnb host invited me to the small gathering he was having on the back patio for his friend’s birthday. I chatted with some nice folks while munching on grilled kebabs and watermelon before leaving the party to pass out from exhaustion.
Day 3: Page, AZ
Food: $22
Lodging: $162 (hotel)
Gas: $0
Other: $66
I slept in until the luxurious hour of 5:30 a.m. before checking out of the Airbnb, picking up some coffee ($3), and heading for Page, Arizona. At the edge of town is the reason the city exists: the Glen Canyon Dam, which blocks the Colorado river to create Lake Powell. I stopped at the visitor center and paid $5 to go on a tour of the facility. I had never seen the turbines of a hydroelectric dam before, and it was neat to experience the sudden temperature drop that came when we plunged down into the concrete structure.
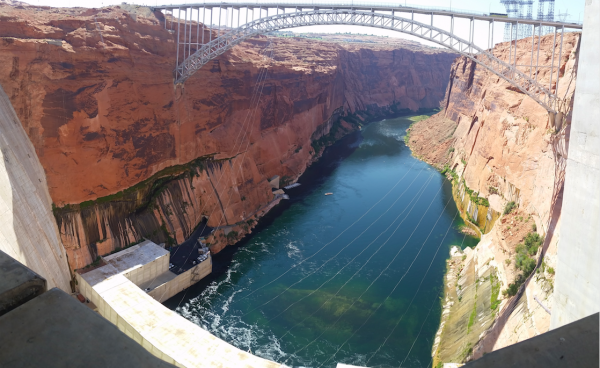
View from the top of Glen Canyon Dam
Next stop was driving out to see Horseshoe Bend. The famous river bend is not part of any official park and free to see, although I did have to wait awhile to find a parking spot. A railing was recently installed near the lookout point, but the sheer drop was still enough to make me keep an extra secure grip on my phone. Afterwards, I also had time to do a quick drive through the Glen Canyon National Recreation Area (free with pass) before my scheduled afternoon appointment.
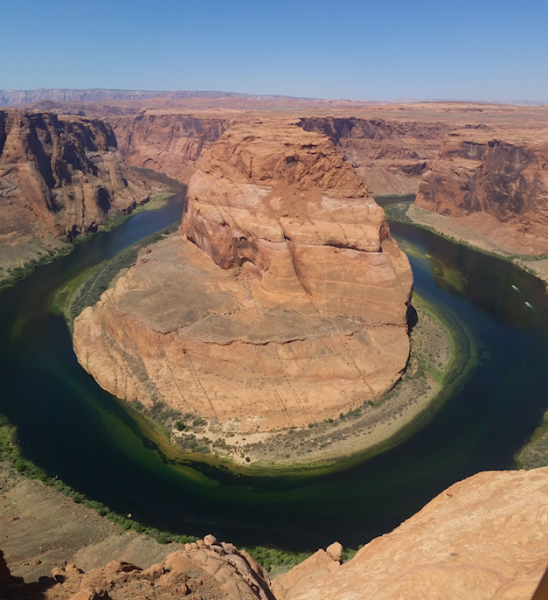
Horseshoe Bend
The highlight of the day was a hike I have been looking forward to for years: Antelope Canyon. One of the most famous and photographed slot canyons, the canyon is divided into the Upper and Lower sections. Both sections are on Navajo land and can only be accessed via a tour from a licensed tour operator. The Upper canyon is more popular, as it is a bit narrower than the Lower and sometimes has light beams that filter down. Consequently, it is more crowded and more expensive, running $60-$90 for the Upper Canyon compared to $50 for the Lower. After some research, I decided to go with the cheaper Lower canyon, and it more than lived up to my expectations.
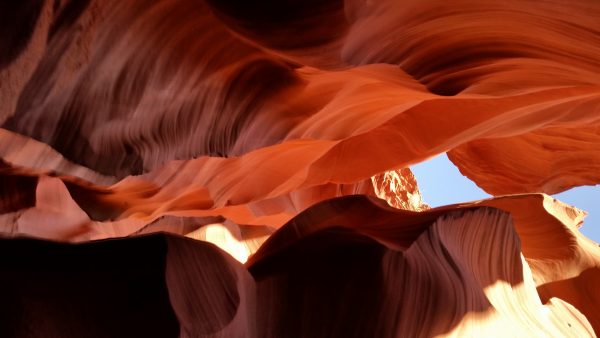
Lower Antelope Canyon
Our tour guide was wonderful, pointing out formations, taking pictures for us, and even showing us how to adjust our camera phones to take better pictures. There were definitely people throughout the canyon, but I did not feel like “herded cattle,” as some had complained online. The canyon was beautiful, and as I went to bed in a nearby hotel ($167), I thought that it was a dream fulfilled to see it in person.
Day 4: Grand Canyon and Flagstaff, Arizona
Food: $63
Lodging: $63 (Airbnb)
Gas: $30
Other: $0
I had not been sleeping well the entire trip, so I was not surprised when I woke up at 1:30 a.m. on Day 4. As I lay there trying to fall back asleep, I thought “if you leave now, you could see the sunrise at the Grand Canyon.” This was definitely a perk of traveling alone — no one else had to deal with my impulse decisions. I drove the two-and-a-half hours from Page to the Grand Canyon south rim (free with pass), walking out to Mather Point just as the sky was lightening up.
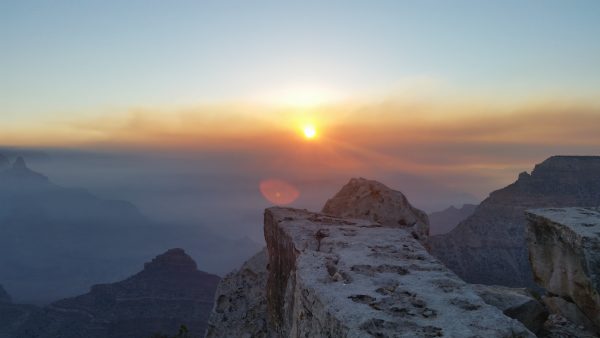
Sunrise over the Grand Canyon
The area was certainly not secluded, but I found it fun to wait for the sunrise with people chatting in several different languages around me. Throughout my time in the national parks, I was able to meet people not just from around the country, but from around world, a benefit of the trip I had not anticipated.
After the sunrise, I got on the Grand Canyon shuttle system to access some of the west side rim trails. I hopped on and off the bus, hiking different sections looking over the canyon rim, but didn’t push myself too much as the early wake-up time was catching up with me. I napped on a return shuttle trip, and was ready to leave the park by noon.
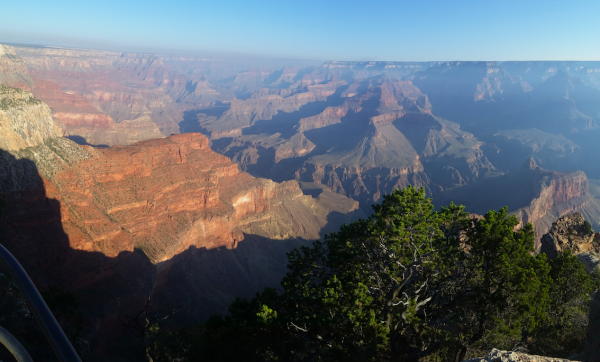
The Grand Canyon, a bit hazy with wildfire smoke
My Airbnb for the night ($63) was down in Flagstaff, Arizona. As I was heading south, I was able to make quick detours through three more parks: Wupatki National Monument, Sunset Crater Volcano National Monument, and Walnut Canyon National Monument. All three were free with my park pass. I even had time to hit up happy hour specials for dinner in Flagstaff ($23) before stocking up again on snacks at the grocery store ($38).
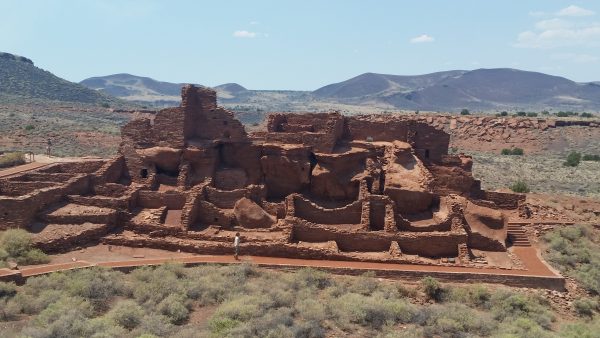
Pueblo in Wupatki National Monument
Day 5: Flagstaff, Arizona to Moab, Utah
Food: $39
Lodging: $86 (motel)
Gas: $46
Other: $20
It was over 300 miles between Flagstaff, Arizona and my next stop of Moab, Utah, so I gave myself a whole day to do the drive. This also meant I had time for a few detours along the way. After fueling up in in Flagstaff with coffee and a hot breakfast ($14), first up was a drive through Monument Valley.
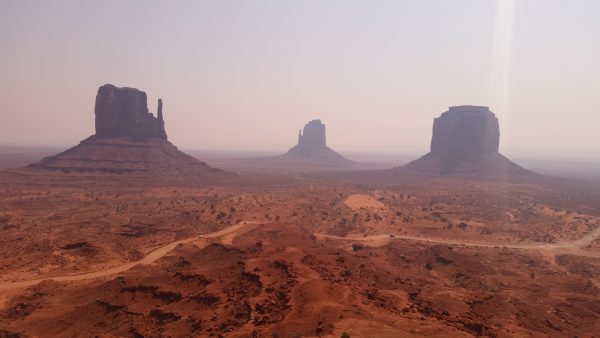
Monument Valley
A famous vista seen in Old Western films, Monument Valley is on Navajo land and requires a $20 entry fee. The visitor center includes an great exhibit on WWII Navajo Code Talkers, but of course the main event was driving around to view the towering rock formations. I found the experienced enhanced with a special “desert driving” playlist I had put together, but was more grateful to have the high clearance and four-wheel drive of my rental car for the bumpy dirt road.
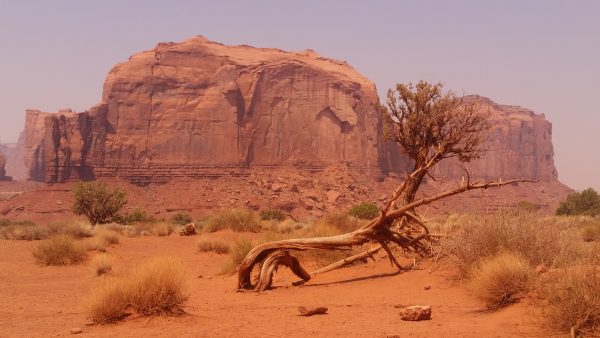
Monument Valley
Some places online suggested visiting the Valley of the Gods, a free BLM managed area farther down the road just outside the Navajo lands, instead of Monument Valley. I drove some of the road into Valley of the Gods, and while the rocks were interesting, I personally found it didn’t compare to Monument Valley.
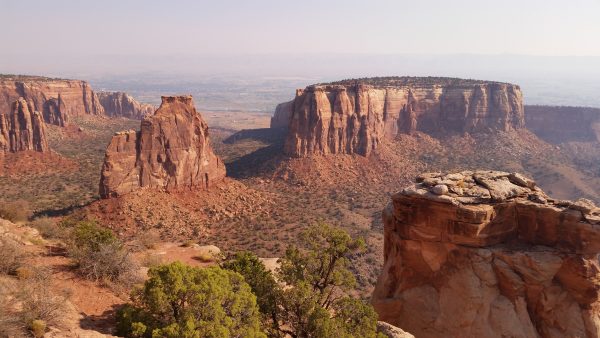
My last detour before Moab was to visit the Needles District of Canyonlands National Park (free with pass). Canyonlands is a very large park, divided by the Colorado river into sections that can only be accessed by driving outside and around park boundaries. The Needles District offers a lot of great backcountry hiking, but both time and temperature kept me on the main road. Big Springs Canyon, however, was an unexpected treat at the end of the drive. It’s hard to capture in a picture, but the rock formations felt like they had been sculpted for a Hollywood set. It was amazing to think about how they had been formed by nature.
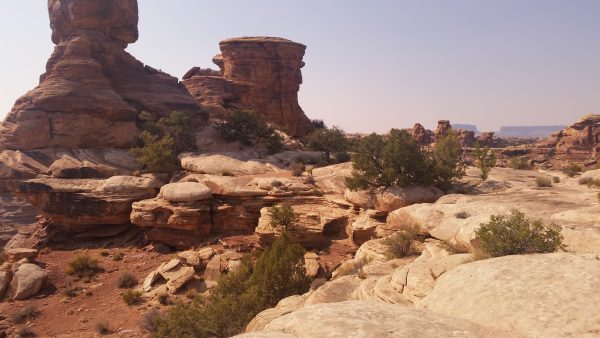
Big Spring Canyon in Canyonlands National Park
On my way out of Canyonlands, I noticed that my gas was lower than I really would like, with over 70 miles left between me and Moab. There was a privately-owned outpost just outside the entrance gate with a sign that proclaimed it sold gas. As I rolled up to the wooden building with ancient looking pumps, I wondered if it was even still active. Inside I was greeted by a tiny puppy and a human attendant, who informed me that they did have gas, but it was $6 for a gallon. I decided to bite the bullet for some mental comfort and bought four gallons ($24). I filled up the rest of my tank in Moab for close to half that price ($22).
Day 6: Arches National Park
Food: $26
Lodging: $86 (motel)
Gas: $ 39
Other: $20
First order of business for my first full day in Moab was to hike out to Delicate Arch for the sunrise in Arches National Park (free with pass). I struck out on the 1.5 miles to the arch in the dark, using a light to guide my way and teaming up with a French couple who happened to be heading out at the same time. Worried about hiking in the dark, I had watched a video online where someone had filmed the entire hike. However, this didn’t save us from misinterpreting a trail sign and ending up going the wrong way up a giant rock for close to 15 minutes. Of course, everyone behind us assumed we knew what we were doing and followed us up the rock. Eventually a dozen or so hikers realized that in fact this was not the trail. My GPS, when I finally got it out, indicated that there was actually a canyon between us and the trail. The French couple seemed to want to strike out on their own, but I ended up working with a couple from St. Louis to track down the real trail. We even made it to Delicate Arch before the sun peeked over the canyon walls.
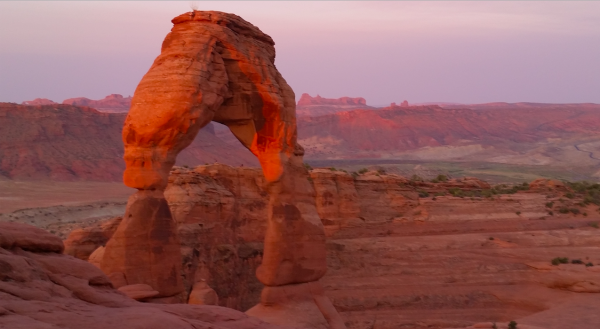
Delicate Arch
The hike back down was much easier in daylight, but I was pretty exhausted. After hitting up a few other short hikes in the park, I went back to my motel room ($86) for a nap and later some dinner ($26). I did, however, find the energy to get up and drive out to Dead Horse State Park ($20 entry fee) for the sunset.
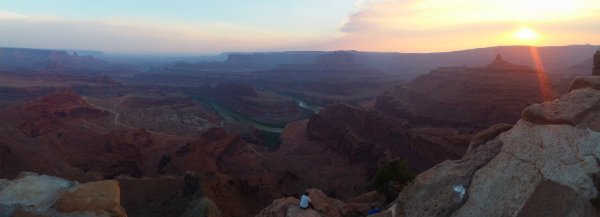
Dead Horse State Park
Day 7: Canyonlands National Park
Food: $41
Lodging: $86 (motel)
Gas: $0
Other: $0
The internet told me Mesa Arch in the Island in the Sky District of the Canyonlands National Park (free with pass) is one of the best places to watch the sunrise. So I got up early again to drive the hour out to Canyonlands. Luckily, Mesa Arch is only a short, relatively flat quarter-mile trail from the parking lot. Even though Mesa Arch turned out to be a bit of a wind tunnel in the morning, the sunrise was definitely great to watch.
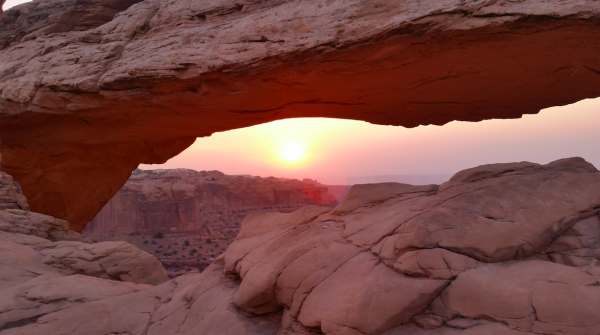
Mesa Arch in Canyonlands National Park
By this point in the trip I was losing a bit of steam. I explored some shorter hikes in Canyonlands before heading back to my room for another nap. After treating myself to a nicer Thai dinner ($41), I headed back out to Arches National Park to explore a few things I had been too tired for on my first visit. I ended the day watching the sunset while sitting in the crook of the North Window arch.
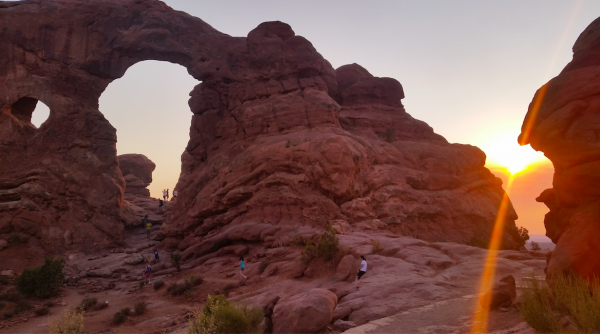
Turret Arch in Arches National Park
Day 8: Colorado National Monument and the Black Canyon of Gunnison
Food: $26
Lodging: $135 (hotel)
Gas: $34
Other: $5
Starting my drive back home to Denver, I grabbed some coffee and a muffin ($6) before heading up into Colorado. Outside Grand Junction I swung through the Colorado National Monument (free with pass) for a quick driving tour.
Colorado National Monument
As I was headed to my next destination, I also took some time to pull over to take some pictures in a field of sunflowers (free). This was definitely another advantage of solo travel — no need to justify backtracking down the highway on a whim.
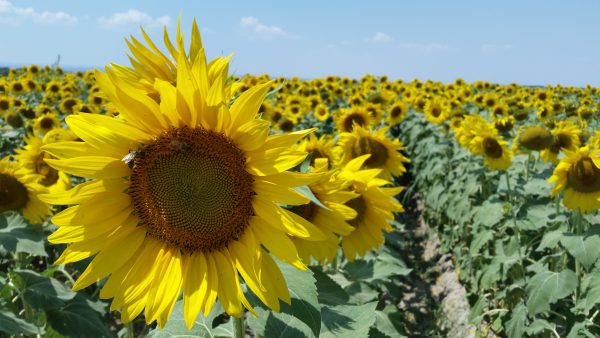
Unexpected, but all the more fun for it
Next was the Black Canyon of the Gunnison. It was interesting to see black stone after having spent the last few days surrounded by red rocks. The canyon also had a road that allowed me to drive down to the river at the bottom of the canyon. The 16-percent grade road meant I had to learn how to downshift for the first time pretty quickly, but the view at the bottom was downright idyllic. The river, softened by a series of dams, was clear and cold, with a few people fly fishing throughout. I found my favorite spot and sat down for an impromptu picnic, the steep walls of the canyon providing relief from the high temperatures up above.
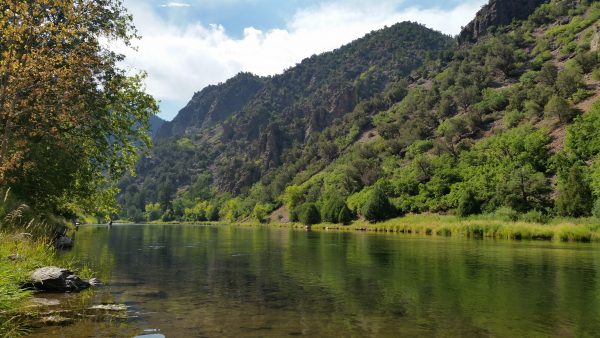
Black Canyon of the Gunnison
Gunnison proper, my destination for the night, was more than an hour down the road from the actual canyon. I made several stops along the way to look at the view, though, as I passed through the Curecanti National Recreation Area (no entry fee, though you have to pay for boating passes).
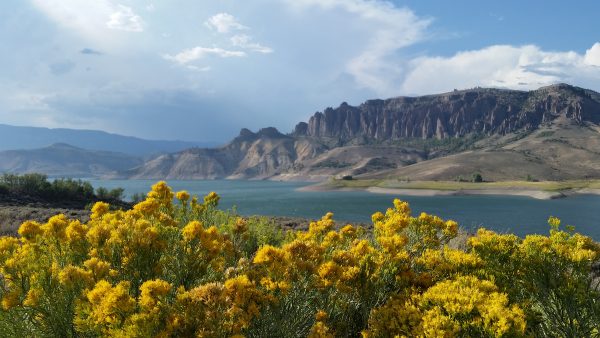
Curecanti National Recreation Area
When I got into town, I learned that my hotel did not have my reservation in their system, and that they were out of rooms. Luckily, they secured me a room at a place down the road for the same rate ($135). As I checked in, I asked the person at the front desk if they had any suggestions for where to best watch the Perseid meteor shower. He directed me to the local observatory. For a $5 suggested donation, I got to look at planets and stars through smaller telescopes outside; listen to a local professor give a talk on the difference between asteroids, meteors, and comets; and look through the big telescope at different elements of the night sky. Gunnison has much less light pollution than where I live — I don’t think I’ve ever seen so many stars before. I could even see the cloudy shapes that mark the milky way with my naked eye. More than worth the sleep deprivation.
Day 9: Heading Home
Food: $7
Lodging: $0
Gas: $40
Other: $425
This road trip was originally supposed to have a few extra days tacked on the end, heading southeast into Colorado. But I was already exhausted, and figured it might be better to have a few days relaxing at home before returning to work. I called to shorten my car rental, bringing my total down to $361. I got some breakfast in Gunnison ($7) before heading straight back to my place outside Denver. It was nice to have a chance to unload everything back into my apartment without packing it up first. After taking a break at home, I dropped off the rental car at the airport and picked up my own car from the lot where I had it stored out by the airport ($48 parking fees).
TOTAL: $1,999
| Lodging | $746 |
| Rental Car | $361 |
| Gas | $217 |
| Food | $326 |
| Other | $149 |
| Tours/Park Entrances | $121 |
| Flight | $79 |
All in all, I’m very happy with how my trip turned out. I certainly could have kept costs down by camping, eating out less, or picking a different time of the year to travel. But this trip was within what I had budgeted, and it created a lifetime of memories. I am glad that I had a few years experience hiking in Colorado before going on this trip. It meant I already had some hiking “street smarts,” earned the hard way, as well as a lot of the hiking equipment needed for this trip. However, I think a trip like this could easily be adjusted to people of all skill levels and hiking inclinations. America’s parks are treasure not to be missed.
Marisa is back hiking in Colorado. She is very tired but very happy.
This story is part of The Billfold’s Experience Series.
Support The Billfold
The Billfold continues to exist thanks to support from our readers. Help us continue to do our work by making a monthly pledge on Patreon or a one-time-only contribution through PayPal.
Comments